vue组件、html里引用vue.js,实现自定义组件,子父组件相互传参、vue2组件、vue3组件用法、component、组件传值
作者:程序员11 时间:2023-06-21 人气:597 QQ交流群\邮箱:1003265987@qq.com
vue组件、html里引用vue.js,实现自定义组件,子父组件相互传参、vue2组件、vue3组件用法、component、组件传值
要展示的内容
自定义组件

一、首先,引用vue.js到页面,版本根据自己的需要,我这里是2点多的版本
<script src="https://unpkg.com/vue@2.7.14/dist/vue.js"></script>
二、创建页面index.html
<body>
    <div id="app">
        <!-- my-load 就是我自定义的组件 -->
        <my-load></my-load>
    </div>
</body>
//只渲染静态的
// let str = `
//   <div class="page-loading">
//     <img src='images/load.png'>
//   </div>
// `
// let myComponent = Vue.extend({
//   template:str ,
// })

//或者动态在data中返回
let str = `
  <div class="page-loading">
    <img src='https://res.5i5j.com/wap/focusrent/images/load.png'>
    <p>{{childrenTxt}}</p>
  </div>
`
let myComponent = Vue.extend({
  template:str ,
  data:function(){
    return {
      childrenTxt:'我是子组件的值哦'
    }
  }
})

Vue.component('my-load',myComponent )<script src="js/my_component.js"></script>
<script>
new Vue({
el:'#app',
data:{},
mounted(){},
methods:{},
})
</script>这时候看页面组件的结构已经渲染到页面了,效果如下

父组件给子组件传值
一、父组件也就是index.html准备数据 ,传给子组件也就是my_component.js
<body>
    <div id="app">
        <!-- my-load 就是我自定义的组件 -->
        <my-load :father_data="testTxt"></my-load>
    </div>
</body>
<script src="js/my_component.js"></script>
<script>
new Vue({
    el:'#app',
    data:{
        testTxt:'今天是周末啊',
    },
    mounted(){},
    methods:{},
})
</script>
二、子组件my_component.js接收值
let str = `
  <div class="page-loading">
    <img src='https://res.5i5j.com/wap/focusrent/images/load.png'>
    <p>{{childrenTxt}}</p>
    <h1>这是父组件传过来的哦:{{father_data}}</h1>
  </div>
`
let myComponent = Vue.extend({
  template:str,
  props:['father_data'],//接收父组件传的值
  data:function(){
    return {
      childrenTxt:'我是子组件的值哦'
    }
  }
})
Vue.component('my-load',myComponent )
最后渲染的页面效果如下:

子组件向父组件传值
let str = `
  <div class="page-loading">
    <img src='https://res.5i5j.com/wap/focusrent/images/load.png'>
    <p @click="clickFun">{{childrenTxt}}</p>
    <h1>这是父组件传过来的哦:{{father_data}}</h1>
  </div>
`
let myComponent = Vue.extend({
  template:str,
  props:['father_data'],
  data:function(){
    return {
      childrenTxt:'我是子组件的值哦',
      childrenData:'放假啦'
    }
  },
  methods:{
    clickFun(){//当点击这个p标签的时候把值传给父组件
      this.$emit('childfun',this.childrenData)
    }
  },
})
Vue.component('my-load',myComponent )
二、父组件index.html接收子组件的值
<body>
    <div id="app">
        <!-- my-load 就是我自定义的组件 -->
        <my-load :father_data="testTxt" @childfun="childfun"></my-load>
        <!-- childfun 触发接收子组件的值 childtext接收到子组件传过来的值 -->
        <p>{{childtext}}</p>
    </div>
</body>
<script src="js/my_component.js"></script>
<script>
new Vue({
el:'#app',
data:{
testTxt:'今天是周末啊',
childtext:'',//用来存接收子组件的值
},
mounted(){},
methods:{
childfun(val){
console.log('val',val)
this.childtext = val
},
},
})
</script>最后渲染的效果如下:


以上是vue写法,以下为vue3写法
vue3组件用法

2、组件header.js添加内容
/**
 **props 接收index传递过来的值header_data 和 li_current
 **header_data 是index页面 传递给 header组件的导航数据
 **menuClick 点击方法, menuitem 传递给index的点击方法,并把值index传递过去
*/

export default {
  data() {
    return {};
  },
  methods:{
    menuClick(index){
      this.$emit('menuitem',index)
    }
  },
  props:["header_data","li_current"],
  template:`<ul class="header-sty">
              <li v-for="(item,index) in header_data" :key="index" :class="li_current == index ?'cur':'' " @click="menuClick(index)">{{item.name}}</li>
          </ul>`,
};
2、index页面引用
<!-- header_data 与 li_current 是传递给 组件header的数据  -->
<!-- menuitem 接收子组件的方法  -->
<top-header :header_data="headerdata" :li_current="liCurrent" @menuitem="menuitem"></top-header>
const headerdata = ref([])//定义导航数据类型
const liCurrent = ref(0)//当前导航下标

headerdata.value = [{id:0,name:'首页'},{id:0,name:'列表'},{id:0,name:'详情'},{id:0,name:'其他'},]

//点击导航改变当前index,传给组件header
const menuitem = (index) => {
   console.log(index)
   liCurrent.value = index
}
<script type="module" type="text/javascript">
    import { test } from 'test.js'
    //do something
</script>
踩坑:注册组件名字 header 、Header 无效,需要换其他的名字
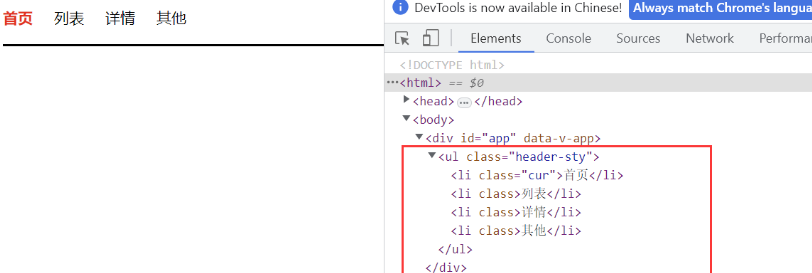
到此完成vue3在html里的组件应用,效果如下:
<!DOCTYPE html>
<html>
<head>
<meta charset="UTF-8">
<meta name="viewport" content="width=device-width, initial-scale=1, maximum-scale=1, minimum-scale=1, user-scalable=no">
<style>
*{padding:0;margin:0;border:0}
.header-sty{height:50px;border-bottom: 2px solid;width: 100%;line-height: 50px;}
.header-sty li{list-style: none;;float: left;margin-right: 20px;font-size: 14px;cursor: pointer;}
.header-sty li.cur{font-weight: bold;color:red}
</style>
<title></title>
</head>
<body>
<div id="app" >
  <top-header :header_data="headerdata" :li_current="liCurrent" @menuitem="menuitem"></top-header>
</div>
</body>
</html>
<script type="text/javascript" src="https://unpkg.com/vue@3.2.36/dist/vue.global.prod.js"></script>
<script type="module" >
const { createApp, reactive, toRefs, ref, watch, onMounted ,onBeforeMount} = Vue;
import Header from './components/header.js'

const app = createApp({
  setup() {
    const headerdata = ref([])//定义导航数据类型
    const liCurrent = ref(0)//当前导航下标

    onMounted(() => {
      headerdata.value = [{id:0,name:'首页'},{id:0,name:'列表'},{id:0,name:'详情'},{id:0,name:'其他'},]
      console.log(headerdata.value)
    })
    //点击导航改变当前index,传给组件header
    const menuitem = (index) => {
      console.log(index)
      liCurrent.value = index
    }
    return{
      headerdata,
      menuitem,
      liCurrent
    }
  },
})

app.component('top-header', Header);
app.mount("#app");
</script>
header.js
// header component
export default {
  data() {
    return {};
  },
  methods:{
    menuClick(index){
      this.$emit('menuitem',index)
    }
  },
  props:["header_data","li_current"],
  template:`<ul class="header-sty">
              <li v-for="(item,index) in header_data" :key="index" :class="li_current == index ?'cur':'' " @click="menuClick(index)">{{item.name}}</li>
          </ul>`,
};链接:https://blog.csdn.net/qq_39109182/article/details/127821485
温馨提示:
欢迎阅读本文章,觉得有用就多来支持一下,没有能帮到您,还有很多文章,希望有一天能帮到您。
- 上一篇:在HTML页面中引入vue组件
- 下一篇:.html页面引入vue并使用公共组件
vue组件、html里引用vue.js,实现自定义组件,子父组件相互传参、vue2组件、vue3组件用法、component、组件传值---相关文章
HTML5-热门文章
活跃用户


